What is the exposure triangle?
Every image captured in the history of humankind has one thing in common, light. Photography at its core is the control of light. To understand how any camera controls the amount of light, you need to understand the exposure triangle.
The exposure triangle is also known as the photography triangle, it consists of three elements. Aperture, Shutter Speed, and ISO. These three elements are responsible for controlling the amount of light that reaches the camera's sensor and the sensitivity of the sensor. Ultimately, these three elements will determine the quality and style of the image.
Each element controls different aspects of the image. The Shutter Speed controls motion blur, Aperture controls the depth of field, and ISO determines the noise in your image.
Let's start by breaking down what happen when you take a picture. When you press the shutter-release button, the shutter doors open for the pre-set amount of time. Light passes through the preset Aperture opening and falls on the camera's sensor. All this happens in a fraction of a second.
Here's an easy way of visualizing the exposure triangle. You have three lines of defense against the light. Aperture is the first line of defense, Shutter Speed is the second, and ISO is your final line of defense. On a sunny day, you want your Aperture as close as possible, your Shutter Speed as fast as possible, and ISO as low as possible to avoid too much light hitting your camera's sensor.
Aperture and how it affects your image
The Aperture is located inside the camera lens. It is the opening that controls the amount of light hitting the sensor.
The Aperture is an interesting mechanism, it has five or more blades that can be turned moving the Aperture ring clockwise or counterclockwise. Turning the Aperture ring will turn the Aperture blades which will increase or decrease the Aperture size.
Understanding the Aperture is simple. the bigger the opening, the more light hits the sensor.
Now on to technical terms, these can be a little confusing. The Aperture opening is measured in f-stops. Some standard f-stop measurements are f1.4, f2, f2.8, f4, f5.6, f8, f11, f16, f22, and so on. Now, here's the crazy part. The aperture opening is widest at f1.4 and smallest at f22. Sounds strange, right? f22 is much bigger than f1.4 but f1.4 is wider than f22.
We don't have to get into the technicalities of what exactly the f-stop is, because it's not necessary to take good pictures. All you need to know is the smaller the number, the wider the aperture opening.
But for those of you who are wondering, the aperture opening is the focal length of the lens divided by the f-stop number.
Aperture opening = focal length of lens / f-stop number
For a 50mm lens with a f-stop value of 22, the aperture width would be:
Aperture opening = 50 / 22
Aperture opening = 2.2727
And, for the same 50mm lens with a f-stop value of 1.4, the aperture width would be:
Aperture opening = 50 / 1.4
Aperture opening = 35.71
And that's why a smaller f-stop value has a larger aperture opening.
Depth of field
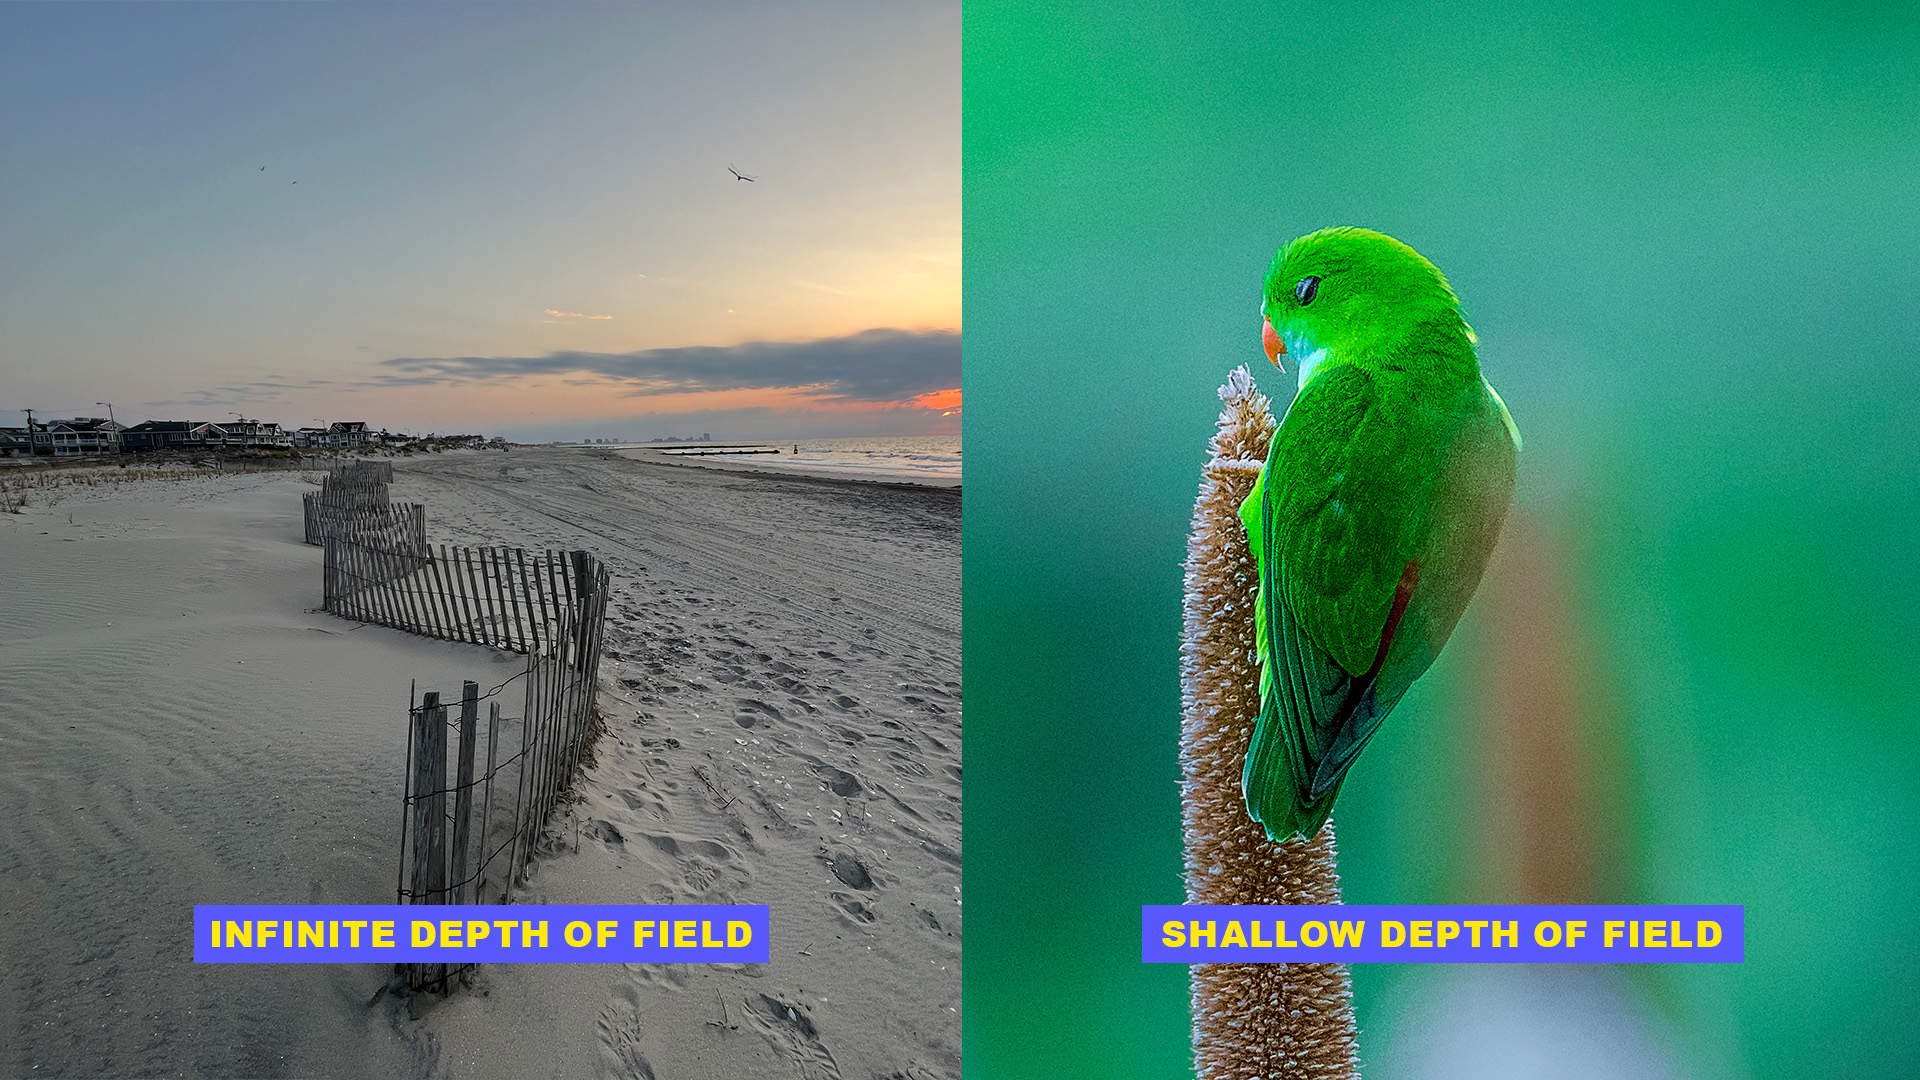
Another important visual look the Aperture creates, or controls is the depth of field. Depth of field is the area in front of the lens that is in focus. A small aperture or an f-stop of 22 will create an infinite depth of field, meaning almost everything will be in focus.
A larger aperture or an f-stop of 1.4 or lower will create a shallow depth of field, meaning only a small area will be in focus and everything else will be blurred or out of focus, usually what we see in portrait photography.
Stops of light
Something essential in understanding photography and working with professionals is understanding "stops" or "f-stops" of light. Every scene requires a certain amount of light for proper exposure or to achieve a certain look. A stop refers to the change in the amount of light. Remember those standard f-stop measurements; f1.4, f2, f2.8, f4, f5.6, f8, f11, f16, f22. This is what you refer to as a stop or f-stop. The first thing you can do is get used to how bright each f-stop is. Ultimately on a set, you would set each light to a certain f-stop using a light meter.F-Stops in Cinema
Cinema is all about f-stops. Lighting is one of the most important aspects of Cinema. If you can light a scene well, you can get away with a lot. The more visually interesting your scenes are the more an audience wants to get involved in the story. F-stop and Aperture are very important in movies. Each light in a scene and the amount of light falling on an actor is calibrated to a specific f-stop. The camera Aperture is probably the most versatile tool you have in your arsenal. Shutter Speed and ISO have limits in Cinema but with Aperture, you can go as wide or close are your scene allows.Shutter Speed or the window of exposure
Shutter speed is probably the easiest variable to understand. Shutter speed controls the amount of time the sensor is exposed to the light.
For example: A Shutter Speed of 1/30 holds the shutter gates open for one-thirtieth of a second. That's a very tiny fraction of time! Now, a Shutter Speed of 1/15 will keep the shutter gates open for twice as long allowing the sensor to be exposed for one-fifteenth of a second. So, the larger the Shutter Speed is, the longer the shutter gates are open, and the longer the sensor is exposed.
If you think about it, it's a strange job. The shutter gates can be held open for 30 seconds or 1/4000th of a second. Yes! The Shutter Speed affects the aesthetics of your image.
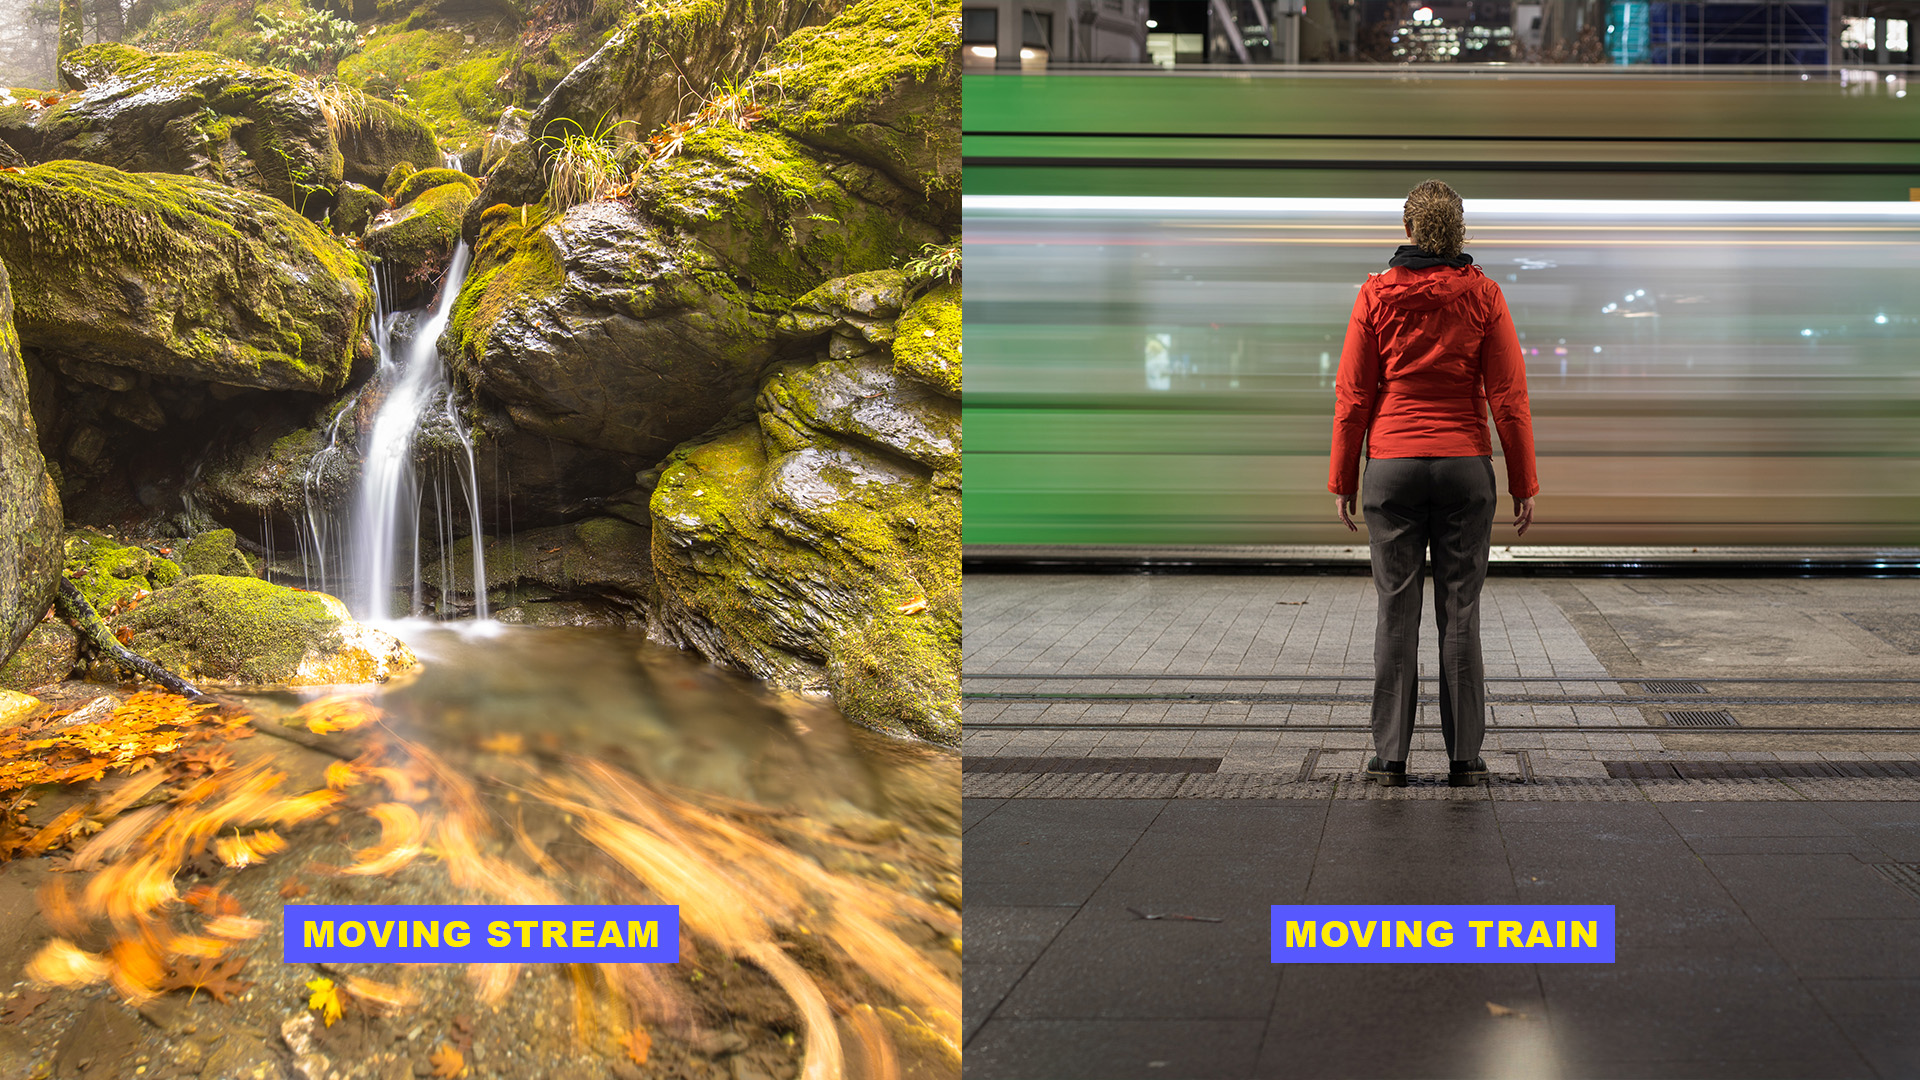
For example: When you have a scene that is busy and you don't have much light in the scene, and you increase your Shutter Speed you'll notice motion blurs in your shots after you go past a certain Shutter Speed. Especially if there are people or animals or something that is in the scene moving fast, you will notice that these objects are smudged on the frame.
On the flip side when you want sharp images and you shoot at a much lower Shutter Speed, after a certain point your image starts to disappear. When you try to shoot at a much higher shutter speed for precision, you lose out on the minimum amount of light necessary to expose the scene.
Shutter Speeds in Cinema
In cinema, a standardized shutter speed is used. The shutter speed is dependent on the frame rate.
Shutter Speed = 1 / (Frame Rate x 2)
The standard frame rate followed by most cinematographers is 24 frames per second. That means the standard Stutter Speed is 1/48.
TV typically follows 30 frames per second. That means the Shutter Speed is 1/60. There are outliers to this. A good example is Peter Jackson's Hobbit, where he changed the Shutter Speed to 1/96 (48 frames per second) for crisper images and reduced motion blur.
Motion blur
Understanding motion blur is important! Motion blur in cinema and photography can evoke emotion. So, it's good to understand it before you use it to evoke emotions from your image or scene.
What is motion blur? Motion blur is an anomaly, it's a flaw in the way cameras are built. In real life, there are no set frames. Time can be sliced an infinite number of times. A camera is limited by its Shutter Speed. For example: Let's say you want to photograph a park on a bright sunny day with a lot of people, pets, and some cars in the background. You set the ISO to 200, you set the aperture to f22, and the Shutter Speed to 1/2. This means your shutter gates will be open for half of a second. So, anything within your frame that has moved within that half a second, will leave trails. These trails are commonly called motion blurs. Motion blur is extensively used in cinema. In photography, long exposure shots are used to show more detail in the night sky than the hum eye can see, and capture some cool light trails left by fast-moving cars at night.
ISO, a unique term for Sensor Sensitivity
If you haven't picked it up by now, let me spell it out. Most of these systems we use in modern DSLR cameras are because we have been using them for a very long time. In other words, the technology has changed, but the process or mechanism has stayed relatively the same. To understand ISO, you need to understand Film Speed. If you have used a film camera, you'll know that when you buy film you have to check for a couple of things. The first thing you check is if it's balanced for Daylight or Tungsten Light. The second thing you check is the Film Speed. Film Speed is a number that defines the sensitivity of the film to light. For a long time, the ASA and DIN Film Speed standards were used. In 1974 they were combined into the ISO standards. ISO is the International Organization for Standardization's way of standardizing the Film Speed number.
Yup, I know! It's funny and interesting to look into the history of ISO. Put simply ISO is the number that defines the sensitivity of your camera's sensor.
Higher ISO means your camera is more sensitive to light and thus needs less light to make a good exposure. The downside here is that there is a lot of noise in the picture. Remember, the ISO does not affect the quality of your sensor. It only increases the sensitivity.
Similarly, lower ISO means your camera is less sensitive to light and as a result needs more light to capture a well-exposed shot. Lower ISOs are great for sunny days. Ideally, you want to keep your ISO between 200 and 800. Yeah, I know that sounds crazy but your camera regardless of what sensor it uses the best quality lies between 200 and 800. Therefore, lighting a scene becomes very important. A typical camera's ISO values include goes from as small as 50 to as high as 6400.
ISO in Cinema
ISO in cinema is very standard. Like I said before cinema is all about lighting. The ISO is usually 200 for Daylight and 400 to 800 for Tungsten Light. Here the ISO becomes less important, you never want to push the camera sensor beyond what it's capable of. So, if you have a top-end camera, then you can go as high as 800 or even 1000 and you get to invest less in lighting. But if you have a lower-end camera, I will not recommend going beyond 800.
I have to end this by saying noise can be a good thing! Film grain or noise is an aesthetic choice. Use it sparingly but use it, don't fear it.
Shooting with different amounts of light
Okay, we talked about the exposure triangle. We went over in detail about all three elements: Aperture, Shutter Speed, and ISO. Now let's talk about some simple exercises so you can put into practice everything we talked about.Master each element
Take your time and learn what each element does. Take photographs during the day, afternoon, evening, and night. See how each lighting affects your frame. Start by setting the Shutter Speed and ISO fixed. Change your Aperture to see what it does to your frame. Then fix your ISO and Aperture and change your Shutter Speed to see what that does. Finally, fix your Aperture and Shutter Speed, and change your ISO to see what that does to your frame.Long exposure photography
Long exposure photography is another gray way to further your understanding of the exposure triangle. Go out after sunset and find a clear sky night or a busy street. Keep your camera on a tripod and set your Shutter Speed past 1 second. Now experiment! Try setting the Shutter Speed so that the shutter gates stay open longer. Change the ISO and Aperture to see what your sensor captures.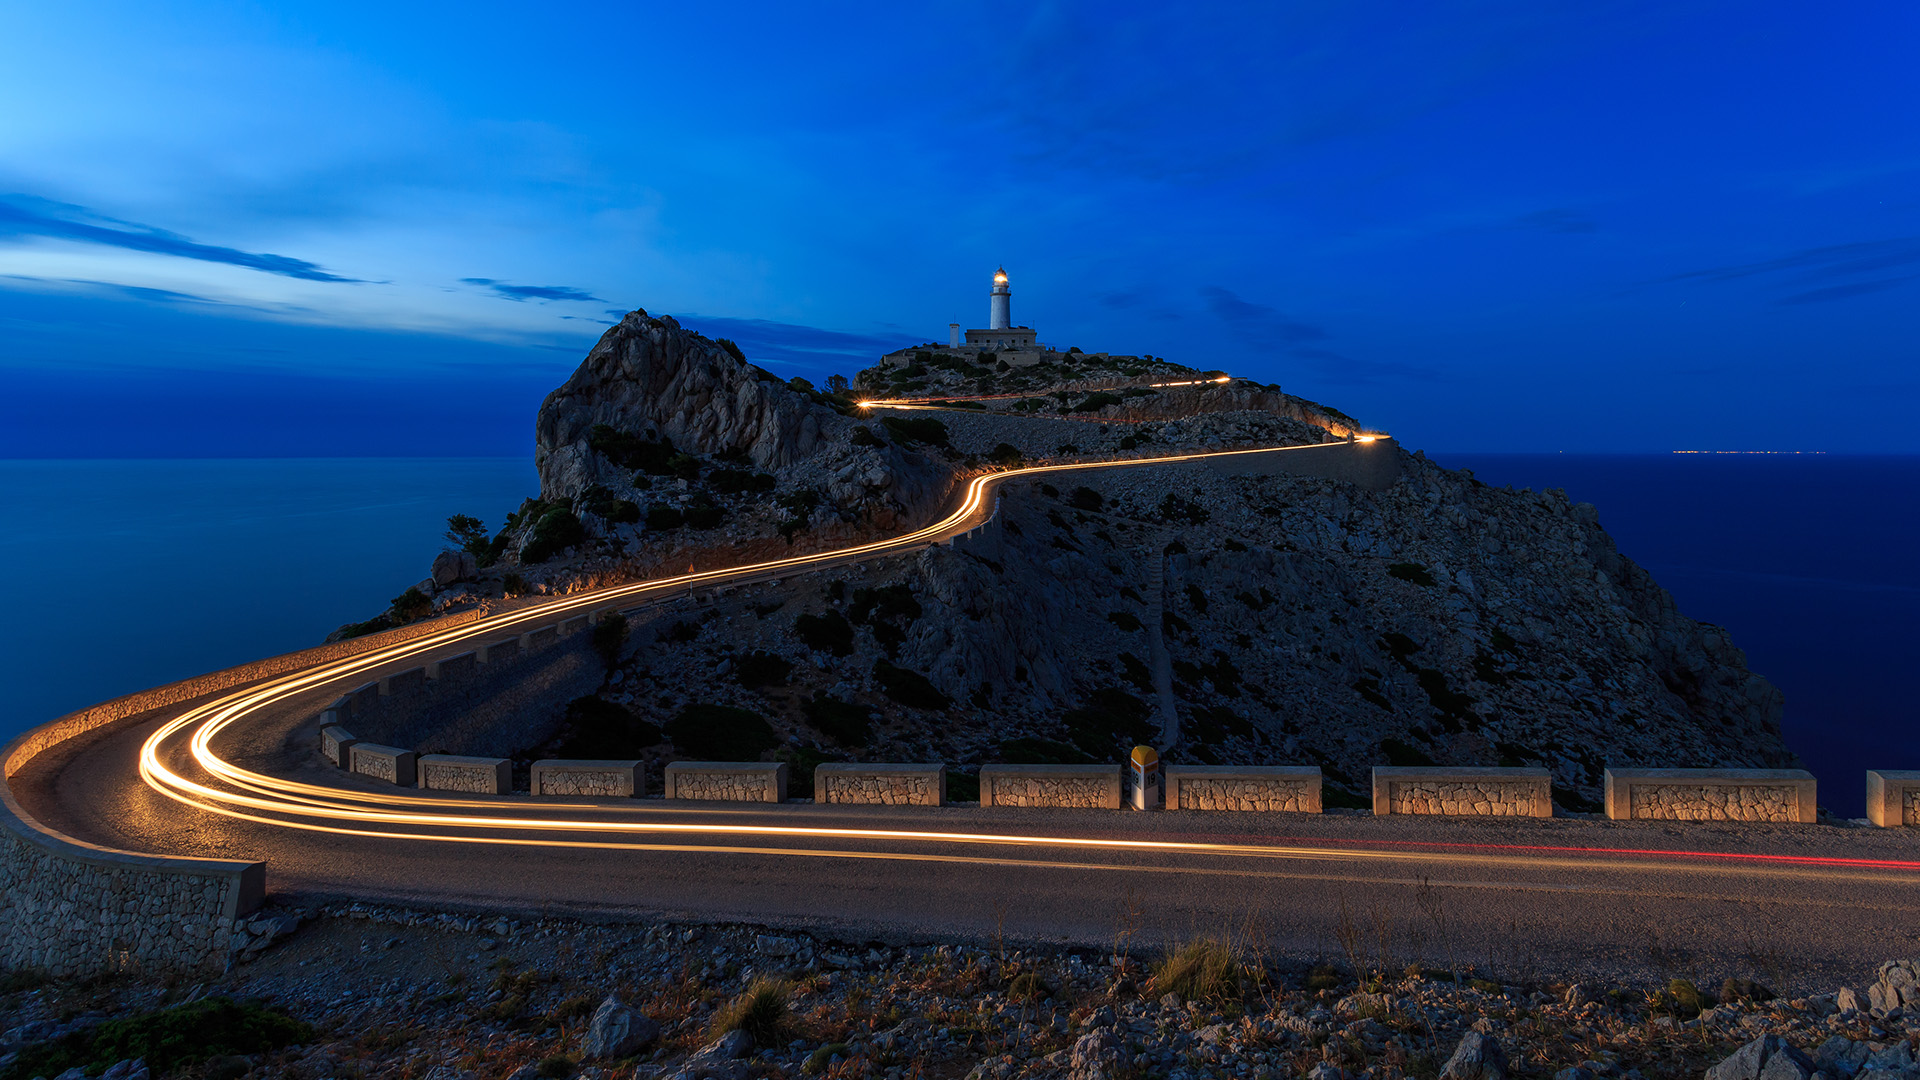
Take more photographs!
My last suggestion is to keep taking photographs. There's no better way to learn than to pick up the camera go outside and start taking pictures. Take pictures anywhere, at any time, with a variety of Shutter Speeds, ISO, and Aperture.
Create a mental library and learn your camera. And before you know it, you'll get faster, better, and more creative.